The Shoot and share phone that lets you capture 5 images in just 1 click. HTC Radars briliant camera lets you capture the moment exactly as it happens. And with easy sharing, your friends can see your photos and videos right away.
Ultra sensitive low light sensor, 5 MP camera with burst mode, easy tag and share on social media networks.
The intuitive HTC Radar knows you will be bored at times, too. The phone has amazing entertainment features that ensure your journeys will fly by. With HTC Watch you can enjoy Hollywood blockbusters at your fingertips.
Do you have a new memory? Want to install to you CPU? Before installing a memory module, make sure to turn off the computer and unplug the power from the power outlet the prevent damage to the memory module. Remember, DDR2 DIMMs are not compatible to DDR DIMMs, DDR2 DIMMs are not compatible to DDR3 DIMMs, and so on. Be sure to install DDR DIMMs was compatible on motherboard.
Example we want to installing DDR2 memory. A DDR2 Memory module has a notch, so it can only fit in one direction.
Follow the steps below to correctly install your memory modules in the memory sockets.
Step 1. Note the orientation of memory module. Spread the retaining clips at both ends of the memory sockets. Place the mory module on the sockets. Place your fingers on the top edge of the memory, push down on the memory and insert it vertically into the memory socket.
Step 2. The clips at both ends of the socket will snap into place when the memory module is securely inserted.
After doing major restoration works on Voxy and Max - she just has to be next - after all she is my first and most roadworthy car. :) She runs like a gem but looks tired and worn out :( Its time to stop ignoring her flaws and get my hands dirty once again :) Ive promised her numerous times that Ill fix her up as long as she doesnt give me headaches. Time to honor my end of the bargain.
Let me show you some of the major problems ill be dealing with.
1. Broken bumper clips and mountings - having a semi lowered ride definitely has its cons - got to be more mindful of those humps and potholes.
2. Nicks and scratches on the bumper - who did this?!?
3. cracked fiberglass skirts - I refuse to let go of these - one day ill go back to all stock (with mudguards and all) but not today - got to fix these!
4. Peeled paint - I used to touch this up with rattle can paint just to hide it - but now that it has worsened - time to deal with this once and for all.
5. Wrath of nature - brought to us by one of the stronger typhoons - neighbors roof + strong winds + parked car = nightmare! Good thing the damage was not that bad.
In the following days/weeks - Ill share how I was able to deal with all of these (and more) while I was under a strict budget (Restoring a volkswagen and planning a wedding can somewhat be expensive - burned a hole right through my pockets hehe).
Stay tuned! :)
P.S. Any suggestions for a cool name for her? :) Wifes nickname and the cars name is the same - need to change it now that were married.
Having tried a lot of ramen places here in Manila, a lot of people have been telling me to try Ippudo (一風堂) when we get to Hong Kong. According to Wikipedia, this Japanese restaurant chain started in Fukuoka, Japan in 1985. The name, which literally means "One Wind Hall" was because there were dark clouds over the Kyushu ramen industry and the founder CEO Kawahara wanted to "blow wind to revolutionize this era." It was not until 2008 that it expanded to the other side of the globe and opened its first overseas branch in New York. It started to become more and more popular and eventually opened stores in Asia - Singapore, Malaysia, China, Hong Kong.
Ippudo in Chinese Characters - and it literally means "One Wind Hall"
Since it was our first time to try this restaurant out, we were all very excited but didnt realize that it was past 9pm when we arrived Silvercord. What surprised me more was that there was still a long line of diners waiting for their turn to be seated. I saw this small black machine by the reception table and so I took a closer look - an automated queuing machine! We slowly looked at how it works (good thing language can be changed to English) and finally got our number. We were number 328 and at that time, they were serving 280+.
Hungry and tired that we were, we opted to stay as we have been looking forward to trying Ippudos ramen. We waited for more or less 40 minutes and finally, our number was called.
Their Automated Queuing System
All the wait staff greeted us as soon as we entered (too bad we didnt understand them). What I loved about their interior is that it was very warm and cozy. What I also noticed is that even though the restaurant is packed with people, they made sure that diners are seated comfortably - arrangement of tables and chairs are not crowded.
As soon as we were seated, we were given the menu and in just 3 minutes, all of us was ready to order. I got the Shiromaru Motoaji and I added an order of their soft-boiled egg as ramen would never be complete without ajitama. It didnt take them long to serve our orders and what I liked about it was even if there were 6 of us who ordered different varieties, they more or less served the ramen simultaneously.
Their ramen was really good as there is consistency in the preparation of the noodles and the broth had a distinct yummy flavor. The slices of pork was actually good as there was not much fat compared to the "char siu" slices of other ramen restaurant chain.
Shiromaru Ramen with Flavored Soft Boiled Egg
Husband on the other hand ordered Ippudo Karaka as this was recommended by their wait staff, he loved it very much as the spice added more flavor to the ramen. We also found out later on that this spicy ramen is one of their best-sellers.
Ippudo Karaka
They have been very consistent in the preparation of their soft-boiled egg. Not all ramen restaurant chains can actually perfect this (some actually overcooks it resulting to hard-boiled egg) and I consider Ippudo to have one of the best ajitamas in town.
Ippudo complete menu:
Although it was already late when we finished, we were very much satisfied with visiting Ippudo. I do hope they get to open one soon in Manila but if not, we highly recommend you to visit this ramen restaurant chain!
I haven’t railed against the rampant greed of the bourgeoisie for a while now because, frankly, it is so ubiquitous that it is like picking low-hanging fruit or shooting fish in a barrel. CEOs, board members, large shareholders … all cut from the same cloth these days.
And if ever there were a story that perfectly illustrates the plight of the middle class at the hands of the increasingly-rich (if that is even possible any more) ruling class, this is that story …
The Spam Factory’s Dirty Secret is a brilliant exposé that documents what happened when the Hormel (pronounced like normal) family’s business transitioned to the Hormel (pronounced HorMEL) of today in the mid 1970s. They went from being a shining star of employee salaries and benefits, workers’ rights, veterans’ opportunities and all things beneficial to a union-breaking, wage-slashing, benefits-reducing, profit-seeking, worker-hurting machine …
This quote sums it up nicely …
But, unlike Jay Hormel, Knowlton was reaching for increased profits (as well as a hefty bump in his own salary) by wresting away worker benefits.
I underlined the root cause of the problem since the 70s … greed. That’s right … even the “shareholder value” mantra that has been taught by business schools since that time is simply rooted in good old-fashioned rampant greed. Greed of the bourgeoisie – those who control the means of production and who occupy this overpaid upper-crust niche in our society.
Here is a quote from a worker who got sick in their plant while working at the head table, where one task was to use compressed air to blow a pig’s brains into a mush and drain it into a barrel for shipment to Asia where it is used as a thickener in stir-fry. This task created a red mist that coated every worker at the table.
"I feel thrown away," she said, finally. "Like a piece of trash. Before, I worked hard and willingly for QPP (ed: a subsidiary that leases a piece of the same plant as a union-busting move), but after I got sick and needed restrictions and told them I was in pain, they threw me away like trash and were done with me."
The bourgeoisie are nothing is not efficient and cold-hearted. Many have ice in their veins that make them seem extra-planetary to the average person. Have you ever thought why? Well, there is plenty of research that show that the incidence of psychopathic tendencies in the CEO population is at least 4 times the average in the general population – with influence far above that percentage, so it is not exactly a surprise that the dollar usually wins. These are the people that we have making some very important decisions with far-reaching implications – like where the middle class work force should reside – and the seeds of our mutual destruction are being planted right here …
If this all sounds a little too leftist to you, then you are probably just fooling yourself that all is well. Read the article and imagine that happening everywhere in some form or another … because it is.
Youve seen videos that condense hours and hours of time into a short clip: a flower blooms in 30 seconds, or a city scene showcases the busy flit of people and traffic as the shadows of buildings move slowly across the street.
You can easily create your own time-lapse video using your webcam and Debut video capture software. Here is what you need to do:
Click the Edit Output button and select the devices tab.
Select the option to Enable Time-lapse.
Specify how often you want an image to be taken. For the charactaristic choppness of many time lapse videos, space image captures apart by a minute or longer. For a smoother result, take captures at shorter intervals.
When your recording is finished, it will be saved as one video clip rather than a series of images, so you can watch the time fly by in a resulting video.
Next, to turn your time-lapse into something really worth sharing, add a title screen using VideoPad video editor. Keep in mind that VideoPad can also do other time manipulations, such as speeding up or slowing down your video footage, in case you want to fine-tune your time-lapse results.
(Last Update: 16 June, 2013) If this information helps you, please pay it forward, and share this article with others who may be experiencing the same problem. Your help in sharing will be appreciated, and karma will prevail!
This has to be THE most common failure mode for a digital camera, a stuck lens, jammed lens, or a malfunctioning lens. Some common error messages that might show up on the LCDs of cameras with this problem include “E18 lens error” (older Canon Powershot), "ACCESS" error (Sony Cybershot), "Zoom Error" (Fuji Finepix), "Lens Obstructed" (Kodak Easyshare), “lens error, restart camera” or just "lens error" (Nikon Coolpix and some other camera makers lately are using this variation). Some cameras might show nothing at all, but merely make a beeping noise as the lens goes out, then in, then the camera shuts off. Sometimes the lens wont even move.
But first, for those Canon S100 owners that are experiencing this issue, stop right here and see this link. Canon might just repair the problem for you for free, regardless of your warranty status. But for all others (including Canon owners that do not own a S100), please continue reading.
The problem is actually quite common throughout all camera brands. Usually its sand or grit interfering with the lens extension mechanism. Or the cameras been dropped with the lens extended. Or the camera has been powered on, but the lens had been blocked preventing its extension. Or the battery ran down with the lens extended. Believe it or not, one BIG contributor to lens errors is using a camera case. Sand, gunk, case fibers, etc... accumulate at the bottom of the case. These materials love to cling to the camera by electrostatic build-up from the camera rubbing against the side of the case (especially those cases with soft fibrous intreriors). Once these materials work their way into the lens mechanism, thats all she wrote. I have many Canons, and NEVER use a case for this very reason.
Note that this problem applies to ALL cameras with telescopic lens barrel (optical) zoom. With Samsungs release of the Galaxy S4 Zoom, Im really curious to see if this will also be a issue/problem with this camera phone (and other phones with optical zoom). I predict (on June 16, 2013) that it will, as most people carry their phones in pockets and purses. If it occurs, Fix 5a would likely be the best technique to correct this problem.
A camera owner that suffers this problem may have no recourse for having the camera repaired. Many camera makers will not honor repairing this problem under warranty as they claim it is due to impact damage to the camera, or sand or debris getting into the lens gearing mechanism (neither of which is covered under warranty). The quoted repair cost is usually close to or more than what the camera is actually worth.
Fortunately, about half the cameras that suffer this failure can easily be fixed by one of the following methods. None of these methods involve opening the camera, although some have potential to cause other damage to the camera if excessively done. If the camera is still under warranty, before trying any of these, please please first contact your cameras maker to see if theyll cover the repair, or to determine how much theyll charge for the repair. Who knows, you might get lucky. But if they quote you a number thats higher than the value of your camera, you may want to consider the following methods.
First heres a video summary of most of these fixes, and following that a detailed text description of the fixes. Recommend reading the text first (along with the readers comments and tips section) as these provide additional tips for situations that the video does not. For example, the video focuses on repair fixes for a camera that does not have obvious damage to the lens barrel (such as from a fall). Thus it does not cover straightening the lens barrel if it is crooked, which the text does. Use the video primarily for further clarification on how to conduct these fixes if you have questions.
Video Summary Fixes 1 through 7
The methods are listed in the order of risk of damaging your camera. Thus make sure you try them in the listed order. And remember, these fixes (especially #6 and 7) should only be considered for a camera thats out of warranty, whos cost of repair would be excessive, and would otherwise be considered for disposal if unrepaired:
Fix #1: Remove the batteries from the camera, wait a few minutes. Put a fresh set of batteries back in (preferably rechargeable NiMH 2500mah or better) and turn the camera on. If using rechargeables, and theyre more than a year old, consider purchasing new rechargeable batteries as they may not be providing sufficient power to startup the camera.
Fix #1a: If new batteries didnt work, try pressing and holding the Menu, Function, Function Set, or OK button while turning the camera on. This along with Fix #1c and #2 sometimes work for lens errors that occur from batteries wearing down while the lens was extended.
Fix #1c: For those of you who can still access your cameras menus with this error, try finding and selecting the "factory reset" option to set your camera back to its original factory condition. On some Canon cameras, this requires holding the menu button down with the camera powered on for up to 10 seconds. However note that a lens error might sometimes override the reset option, and thus the option might not appear.
Fix #2: If the cameras batteries ran down completely while its lens was still open, the camera may show a lens error or not start properly when new batteries are installed. Remove the memory card and keep it removed, then install the new batteries. When you turn the camera on with the card removed it may come back to life, as this triggers a reset in some cameras. Error E30 (for older Canons) means that you dont have a memory card installed, so turn it off, slip in the SD card and turn it on one last time
Fix #3:Insert the cameras Audio/Video (AV) cable, and turn the camera on. Inserting this cable ensures that the cameras LCD screen remains off during the start process. Thus extra battery power is available to the cameras lens motor during startup. This extra power can be useful in overcoming grit or sand particals that may be jamming the lens. If the AV cable doesnt fix the lens error by itself, consider keeping this cable installed while trying fixes 4, 5, and 7 as a means to provide extra power to help to these fixes. But note that I DONT recommend keeping the cable installed during Fix 6 as you may damage the AV port while tapping the camera. Reinsert the cable only AFTER tapping the camera.
Fix #4:Place the camera flat on its back on a table, pointed at the ceiling. Press and hold the shutter button down, and at the same time press the power-on button. The idea is that the camera will try to autofocus while the lens is extending, hopefully seating the lens barrel guide pins back into their slots.
Fix #5:Blow compressed air in the gaps around the lens barrels with the idea of blowing out any sand or grit that may be in there jamming the lens. Other variations include blowing with a hair dryer in “no heat” setting, or sucking the gaps with a vacuum (careful with this one). Some people also have actually used a "Shop Vac" with this fix to help extend a retracted lens.
Now were entering into the realm of potentially damaging your camera in conducting the fix. There is definitely some risk here, so take care when conducting the following fixes:
Fix #5a: If you actually do notice sand particles stuck in the gaps around the lens barrel, and blowing air does not help to dislodge them, consider using a thin piece of paper or a sewing needle to help dislodge them. Pay particular care not to scratch your lens barrel with the needle. Also, I do not recommend probing too deeply around the lens barrel with the paper (dont go more than a 1 cm or 1/2 in) . Particularly I do not recommend probing deeply around the most outer (largest) lens barrel gap, as you may dislodge the lens barrel dust gasket thats located just inside of that gap.
Dislodging Particles from Lens Barrel Gaps (Fix #5a)
Fix #6: Repeatedly tap the padded/rubber usb cover on a hard surface with the intent of dislodging any particles that may be jamming the lens. Other variations include hitting a side of the camera against the palm of your hand. A lot of people have reported success with this method. HOWEVER, there is also some obvious potential for damaging or dislodging internal components with this method, such as unseating ribbon cables, or cracking LCD screens.
Fix #6a: This is a variation of Fix #6, and should be tried if the lens barrels appears straight (not crooked). In other words, try this if theres no obvious mechanical damage to the lens barrels thats causing the problem. With the lens pointed down, try "gently" tapping around the lens barrels with a small item such as a pen or pencil. The idea is to try to dislodge any sand particles that may be jamming the lens barrel stuck. Simultaneously try turning the camera on and off as youre doing this.
Dislodging Particles by Tapping (Fix #6a)
Fix #7a: Note that this particular fix is intended only for cameras with lens barrels that try to extend, but then stop partway, and then return to their stored position. Try grabbing and holding the smallest inner lens barrel at its furthest extended position, preventing it from returning to the camera. Examine and clean around the lens barrel any noticed dust or dirt. Turn off and restart the camera again. If the lens extends even further, grab it again at its furthest extension, preventing it from returning. Clean again. Keep repeating until the lens is fully extended. Turn off the camera and restart it to see if the lens error has gone away.
Fix #7b: The most extreme of the fixes. Only consider this fix as an absolute last resort before tossing the camera, as theres some obvious potential for further damaging your camera by using this method. You especially might consider this if the lens barrel appears obviously damaged, bent, or crooked such as from a fall. In that case, try thinking of the lens as a dislocated shoulder. Try forcing the lens to straighten it and put it back in its place. In such cases, the lens barrel guide pins have become unseated from their guide slots (see the below illustration). Your objective would be to try to reseat them by straightening the lens. Listen for a "click" to hint that theyve been reseated, and immediately stop forcing the lens at this point. More people have reported success with this method than with any of the other methods (see the polls in the right column).
Variations to Fix #7b include gently pulling, rotating, and/or twisting the lens barrel while hitting the power button. Examine the lens barrels closely for any hint of tilt or unevenness. Again, the goal is to attempt to straighten or align the barrel if its crooked or twisted. Another variation includes looking for uneven gaps around the lens barrel, and then pushing on the side of the lens barrel that has the largest gap (note pushing the lens barrel all the way in is NOT recommended as it may become stuck there). Again, while doing any of the above, listen for a click that indicates that the lens barrel guide pins may have reseated in their guide slots. If you hear this click, immediately stop and try the camera. The following photo illustrates unseated guide pins that would cause a lens error.
If you try these fixes, please vote or post a comment on how the fixes worked for you. Your experience may help others. Note that most of the fixes listed here actually come from my readers comments. If the above fixes didnt work for you, then please read through the readers comments, especially the newer ones. There are other techniques listed from readers there that just might work for your situation. When posting a comment, please specify your camera model, and the particular fix that worked. Please also comment if none of the fixes were successful, or if you tried something different that worked.
References:
Canon E18 Lens Error – This is the big kahuna of all E18 error camera repair sites: Make sure you also read their post section to hear of other peoples successes and failure in fixing this problem: More Canon E18 experiences and fixes at The Juggle Zone.
The E18 Error Experience Log. Even more Canon E18 experiences, plus a good listing of E18 errors by Canon model:
Nikon Coolpix L3 Lens Error - This site has a few other fixes not listed here that are applicable to the Nikon Coolpix cameras:
Jancology.com Nikon 5700 Lens Error - More peoples experiences with lens errors on Nikon cameras:
SD600 Disassembly - Included this as an example of how sand can easily gum up the small gears within your camera. The website also shows a simple method for cleaning these gears.
Finally, Im curious just how many people actually read this far down into this article. For those people, here are two totally unrelated videos (to this subject) on video editing using freeware. Enjoy!
One of the neat things about our VideoPad Video Editor is the ability to not only output a YouTube-ready video, but the ability to upload a video directly to YouTube, making the transition from local to internet viewing quick and easy, eliminating much of the upload hassle on your part. How? Take my hand, friend, and well walk across this avenue together.
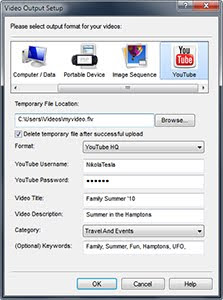
Inside VideoPad (and once you’re happy with your finished video), go up to the top menu and select the "Save Movie" button. This will bring up a dialog box with export settings for a variety of formats at the top. From this menu, scroll over to the rightmost selection, (YouTube), and select the YouTube icon. Once selected, you’ll notice that you have new, YouTube-specific options below, such as where to save your file locally, YouTube login details, places to add details about your movie, keyword information, etc. Fill in the blank fields and hit "OK". From here, VideoPad goes into autopilot and will remotely login to YouTube, encode your movie and upload it for you; all you have to do is sit back and relax.
This is just one of the many small innovations that make VideoPad one of the most user-friendly video editing packages available. If you’d like to jump into the editing arena, VideoPad offers an intuitive, simple interface so you’ll be editing your own masterpieces in no time. Try VideoPad free, and if you’re new to VideoPad or looking for a more in-depth look at the finer points of editing, watch our VideoPad tutorial series to help get your feet wet.
About a week ago, a stranger added me on Facebook and asked me for the recommended place to develop film and digital scans in KL. Since I have almost zero knowledge on film photography, I asked around some of my friends (amazingly many of them) who do shoot film, and I gave the preferred shop for film development to him. On late last Saturday, he messaged me again through Facebook, saying that he went to Chow Kit earlier on the day, and he has sent his film for development. I was shocked when I found out he was at Chow Kit, because on that very same Saturday morning I was also shooting there with my friends !!
Shaun (now no longer a stranger) from Brisbane, Australia is a very dedicated Olympus shooter, he has been shooting with Olympus, starting from the OM4-Ti days, and when Olympus went digital, he has had almost tried and owned all the incarnations of 4/3 system DSLR bodies, going all the way back to the first generation E-300. It was indeed very refreshing to see another person so crazy into Olympus stuff. He also had recently acquired the OMD, which unfortunately had to be sent away to Olympus Service Center for servicing (something is wrong with the sensor, producing only horizontal lines), but the good news was, Olympus Malaysia was very kind to offer him help, though the OMD was purchased in Australia. Another great fact that I found out about Shaun was that his favourite gear setup was the Olympus DSLR E-5 and the beautiful Zuiko Digital 50mm F2 macro, which happens to be my staple weapon of choice these days on the streets. He strongly commented that he has spent about ONE full year shooting with just the E-5 and the 50mm, and he had produced many amazing photographs with the setup during his travel, as well as his underwater adventures.
Knowing that Shaun loves street shooting and he is an Olympus fan much like myself, we met up at Pavilion last night, together with some of my usual shooting friends, Luke and Kelvin, and of course, we had a brief shutter therapy session at Bukit Bintang streets.
All images were taken with Olympus DSLR E-5 and Zuiko Digital 50mm Macro F2
I also found out that Shaun has been to Malaysia very often during his work trips, and he has spent a great deal exploring the local places and food. That saved me a lot of trouble introducing him around, and we went right on to shooting. He carried around with his two camera bodies, the PEN E-PL2 and the film OM4-Ti (since his OMD was in service center). It was my first time seeing an Olympus OM4-Ti, and my goodness, it looked so much like the OMD E-M5, which based its design largely on the OM4-Ti.
Shaun shall be away but he will return again next week, and I look forward to bringing him into some of my usual street hunting grounds. Thanks Shaun for being there with us, and we shall attack the streets again soon.
 0
komentar
0
komentar